A Quick Guide to Becoming Obsessed with Obsidian
Intro
The title is a slight misnomer. This is more like a series of small guides where I showcase cool tricks and workflows I've learned or discovered in Obsidian. If you are anything like me, you'll end up spending a lot of time creating small systems like these, justifying the title. These are what I find useful and/or fun, meaning this is not objectively the best and/or right way to do certain things in Obsidian.
What is Obsidian?
The free and flexible app for your private thoughts. (Obsidian website)
Obsidian is, in my own words, an incredibly versatile tool that can organise pretty much anything. To prove that, heres some usecases I personally have used it for:
- DnD campaigns (this is a popular use!)
- Narrative design
- Daily journaling and tasks.
- Organising university notes
- Organising notes about my hobbies.
- Creating a game library, with reviews and metadata attached.
- Creating a Fallout: New Vegas style with a retro theme
- Syncing all of the above between my PC, phone and Uni Workstations
Important Note: If your just starting out, I recommend not thinking too hard about this post. I don't want to overwhelm you! Just start by jotting down what you want to remember for later in a plain old note. Before long you'll start researching ways of doing things better in the way your brain likes to do them. But if you still want a guide on certain areas, you are more than welcome to keep reading :)
I'm ready to learn!
Great! I have lots of little snippets I'm more than happy to share. I recommend using the Table of Contents below to skim through and pickup what you find interesting.
I'll be using the default Obsidian theme for dark mode, other than any guides that talk about themes directly. These guides were made on Obsidian 1.14.4 for Windows 11 but should still be up-to-date. Lemme know if that changes!
For Absolute Beginners: The 'Game Library' guide is the best place to start! It assumes you have very little Obsidian and scripting experience. If you want help traversing Obisidian's settings then that one is a good starting point!
Table of Contents
Game Library [Beginner Friendly]
Whilst this one wont make you more productive when it comes to work time, its a very fun and stylish way of storing a collection. Whilst I use it for my steam games and reviews of them, it can obviously be extended to many things. For example, it would be easy to make this for other media such as books, films and TV. It's also easy to set up, only using core obisidian features and plugins! It doesn't have to take up lots of storage space for images either, thanks to a neat trick i'll explain.
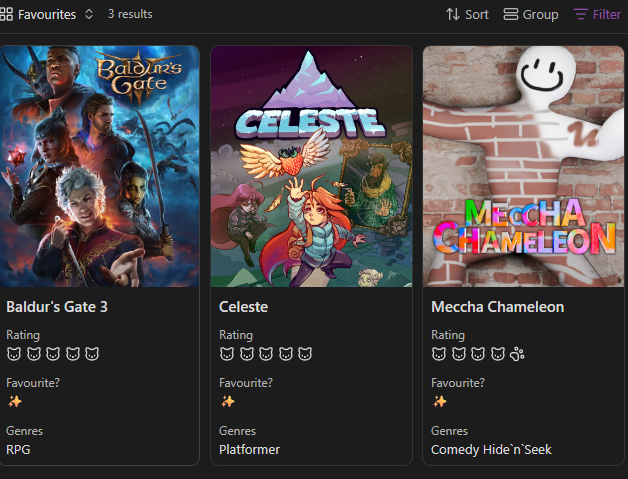
Final Result Gallery
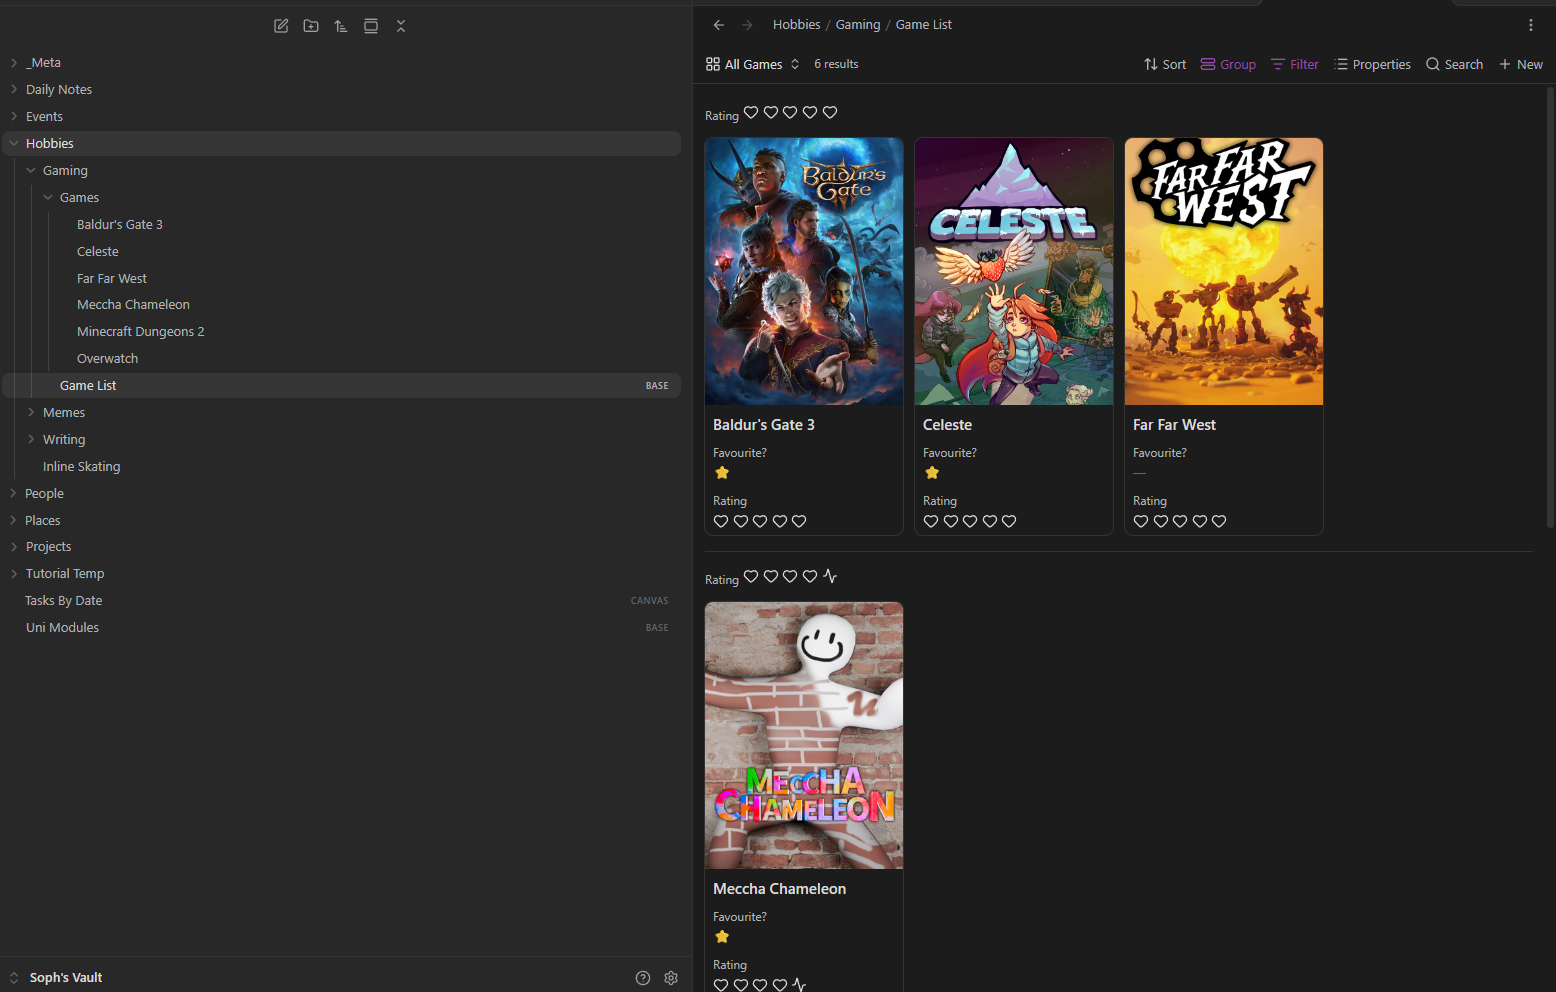
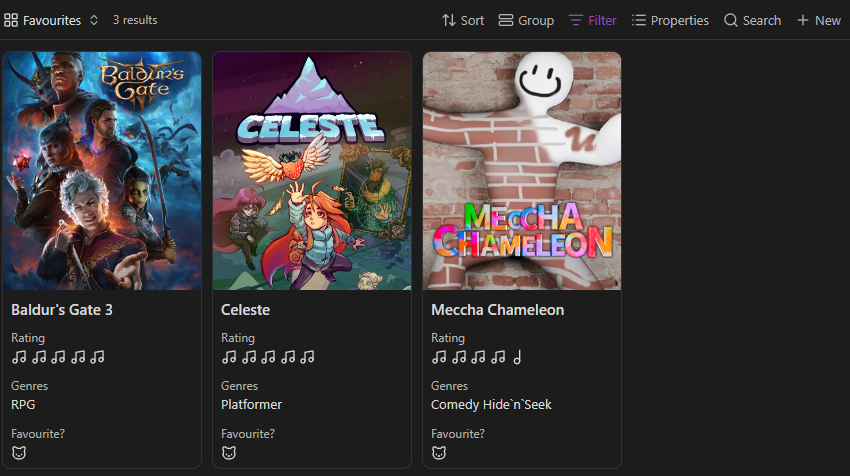
Prerequisites
First, you want to make sure the core plugins "Bases" and "Templates" are enabled. Bases should be by default, but I made a quick diagram below for enabling Templates. They are both in the Settings > Core Plugins list!
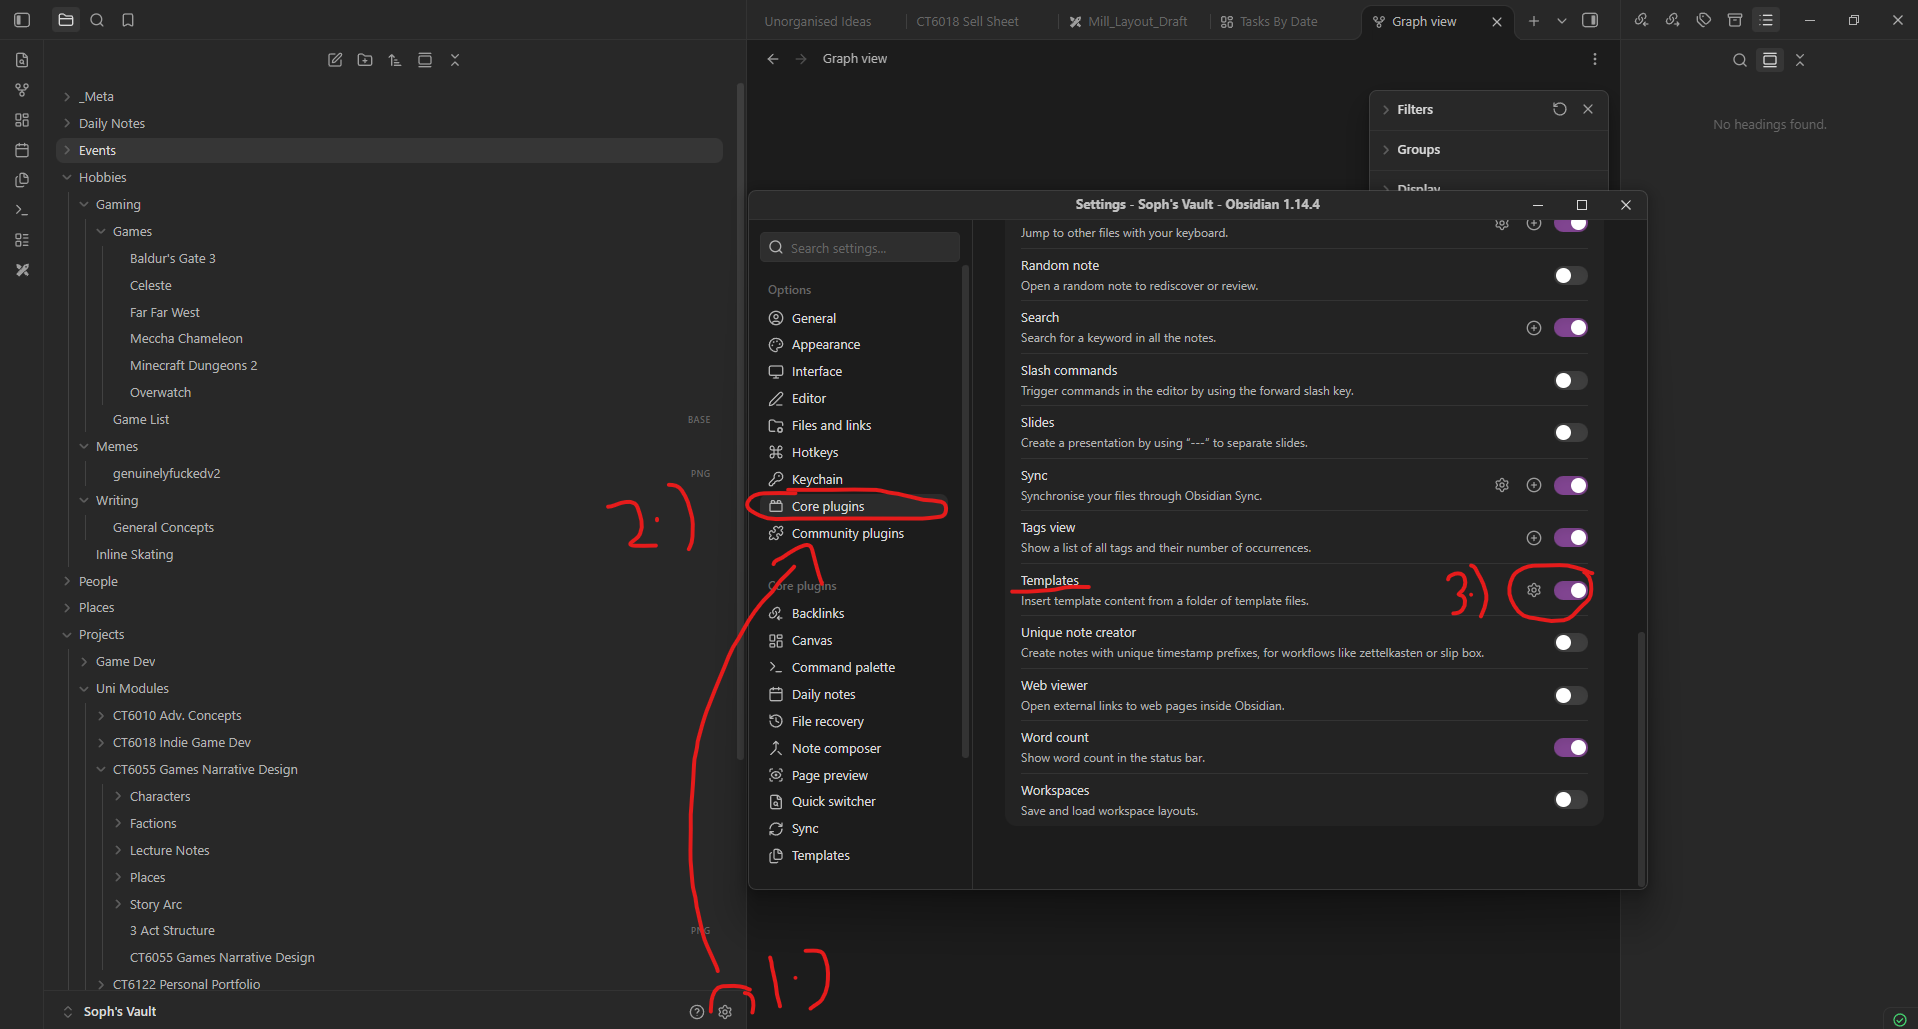
- Click the cog wheel at the bottom right of your file list to open obsidian settings
- Click "Core Plugins" on the settings list
- Ensure Templates and Bases are ON.
How To
Creating the Game Template
This is where you will make the template page each game uses. Templates are great for creating lists of notes for other collections too, like your favourite albums or resteraunt reviews!
In the diagram, theres a cog next to the on/off slider. This is where you can find the template settings.
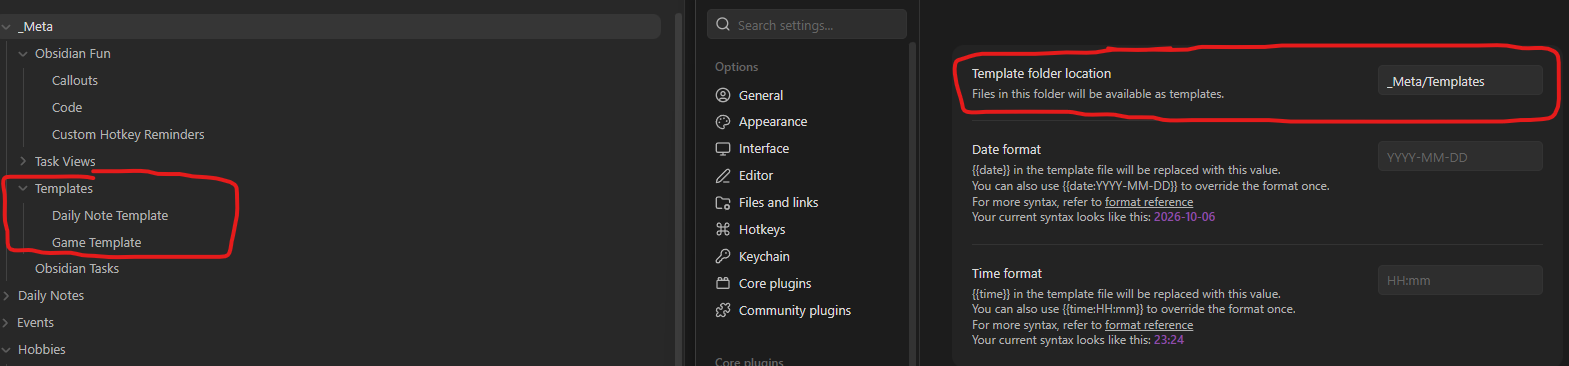
Once you have a folder for your templates, you can create a new note called "Game Template" inside of it.
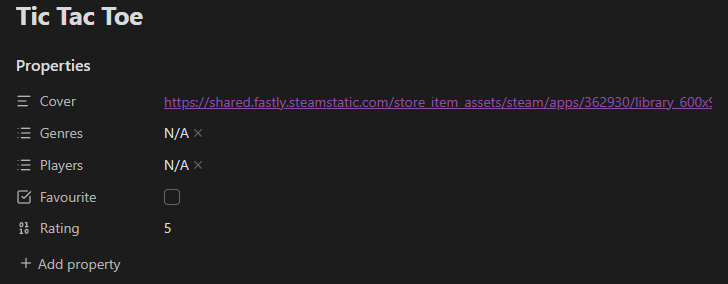
If you want to get the games to have their cover art like in the Final Result Gallery, then you'll also want to add some note properties. Visually, these are pairs of names and values that are shown at the top of a note. In this tutorial, it will tell Obsidian what image to use as the cover for each game.
- Press
Ctrl+;, or use the Command palette to run the "Add File property command - Add a new property on the left of the table called "cover"
- You can leave the cover blank as this is a template, or to save time later you can add the link to https://steamdb.info
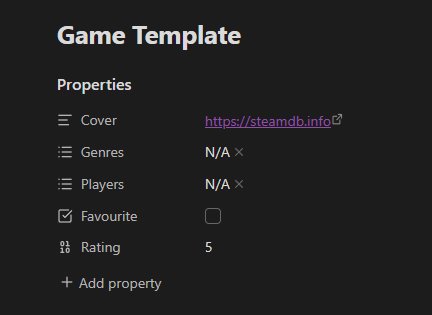
It should look a little like the above! I've added a couple more that could be useful later like the games genres, so feel free to do the same! They might come in handy later... :)
This rest of this note is just how all of your games will be formatted, so you can freely edit that! You can leave it blank, or leave a formatted space for notes and review etc. like I have.
Using the Game Template
This step is a little easier. Make a new folder seperate from the templates called Games, and create another new note. You can use the command palette to insert the game template. Don't worry if it sounds too codey, its really just a quick way to do stuff you dont have hotkeys for :)
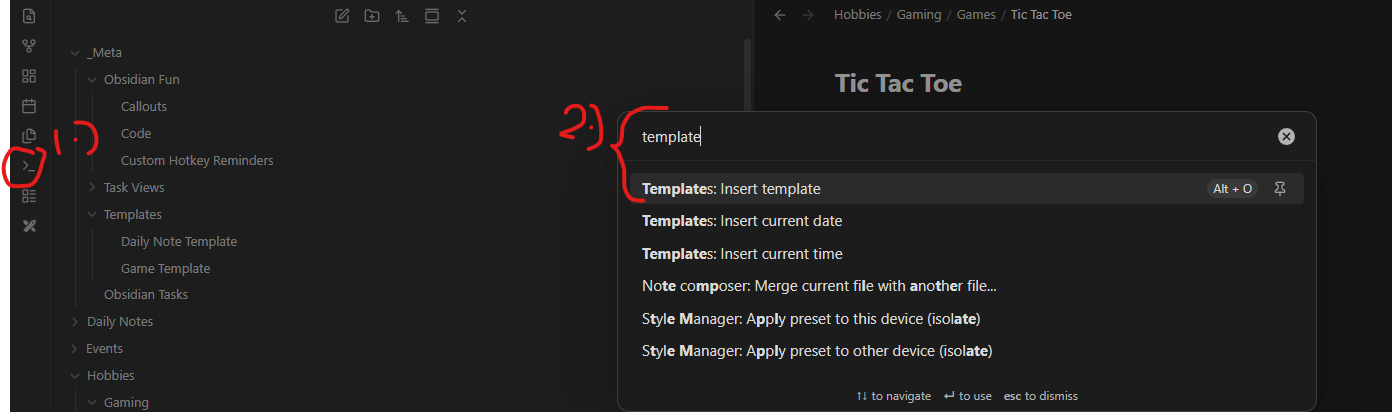
- Click the "Open Command Palette" (
>_icon) - Search "template" and click insert template
- Click on your game template
Your template should now be in your note!
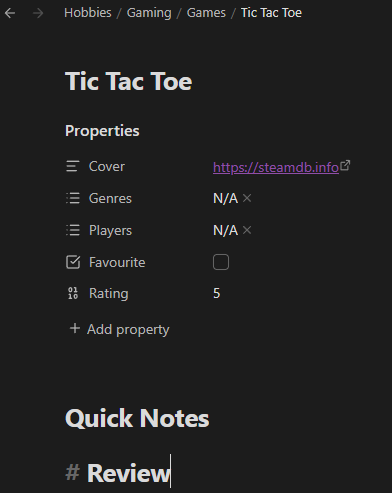
Feel free to fill out the information here. Ill save the rating and cover for the end of this guide though! For now, you can set up the library of cards that makes it fun to flick through :)
The Library View
Heres where the Bases come in. Theres quite a few steps here so ill condense it a little bit
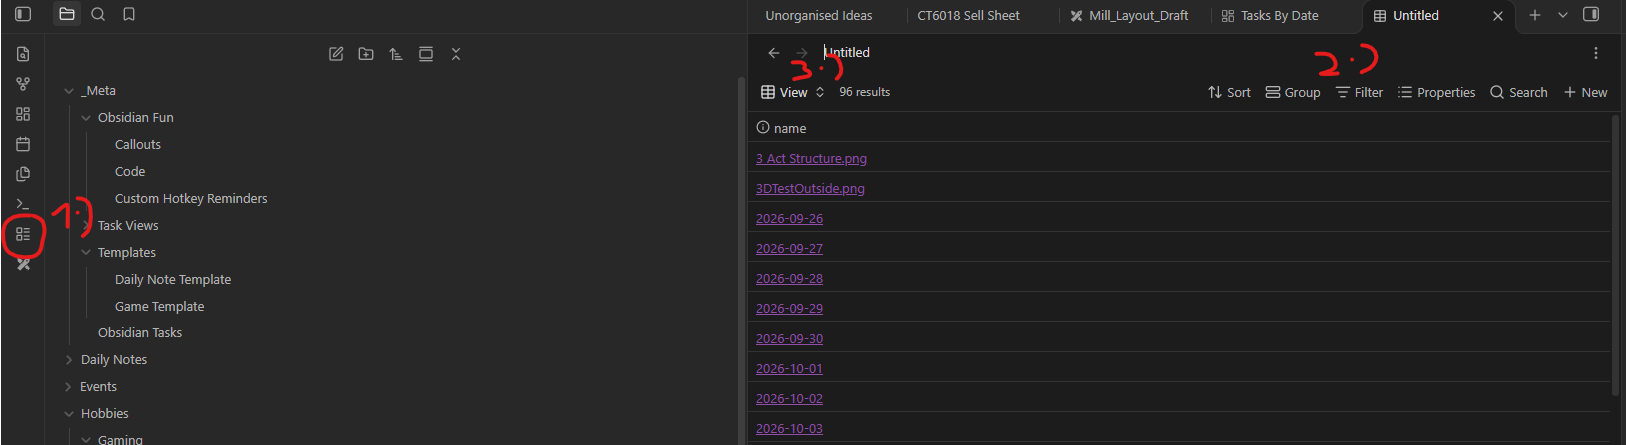
- Create a new base with the button on the left below the Command Palette. Don't panic if your entire list of notes shows up in this new table!
- Click filter. Here you can define what notes show up in this view. It is made up of a few dropdowns you want to change. Change:
- 'File' to 'Folder'
- 'links to' to 'is'
- The last one to your games folder
- Click view, then the small arrow, and change the Layout dropdown to 'Cards'
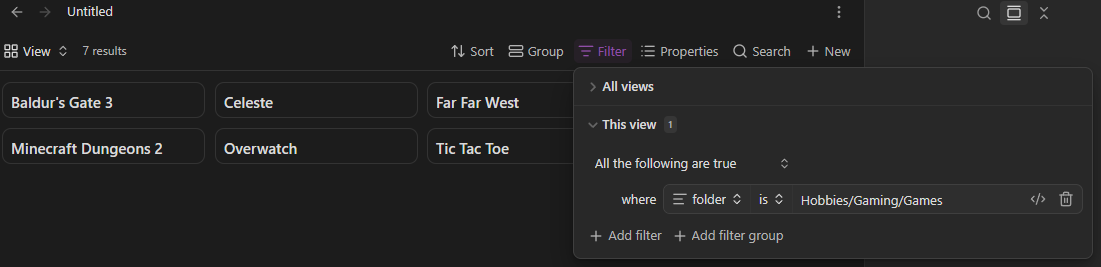
This works! You can click on the games and it opens. Its clearly missing some of the features I advertised though.. let's add em now!
Adding the Cover image
This is definetly the flashiest part, sorry it took me a while to get to this point!
Firstly, you want obsidian to know which property has the image for each game in the library you just made.
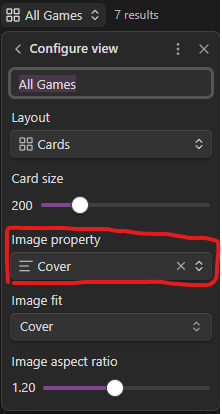
Go back to where you changed the view to cards, and set the image property to use the cover.
The other settings in this 'Configure View' menu are also useful for changing the cards size, shape and image settings! Note that these apply to all cards in a view, so you ideally want every image you find later to be a similar size and aspect ratio.
You can add the individual images for each game in two ways: Local images in your vault, or links to web images. You can mix between these two methods, Obsidian will figure out its an image either way! I personally use the latter for saving storage, but heres a quick comparison chart for both:
| Local Images | Web Images | |
| Storage size | Depends on image size - can eat up cloud / drive space. | Only a few characters - tiny! |
| Requires Internet | No | Yes |
| Can link break? | No | If image is no longer accessible, yes. |
| Difficulty | Trivial - Drag and drop | Low - Requires finding assets but is easy from there |
Local image route
Drag and drop an image into your vault. Then, just drag and drop that into the cover section of the games properties. Thats literally it!
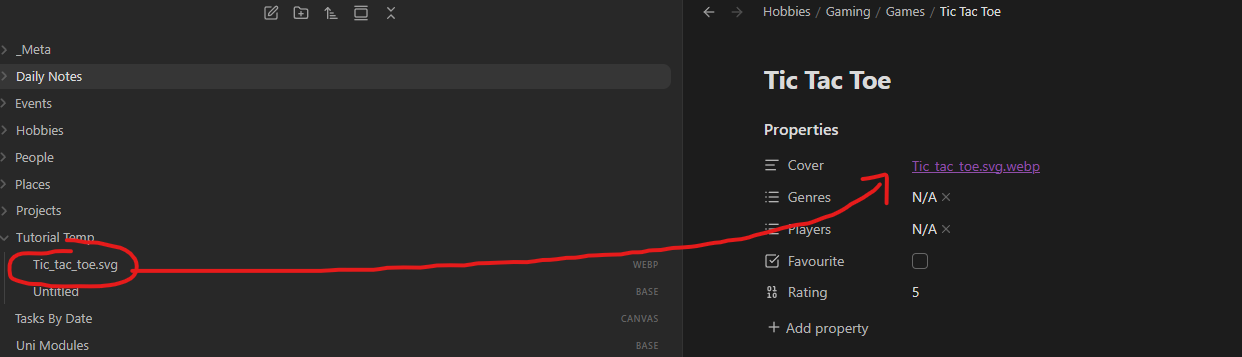
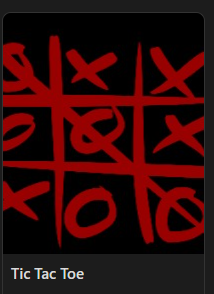
You can also manually link to the image in your vault by typing an internal link with square brackets.
Web image route
You want to get a link to an image online for this to work. For steam games, I use that SteamDB website. Below is a very short guide on how to get an image from there!
Getting a Steam Capsule Image
Search up the game you want on SteamDB. Once you find it, go to its page and find the "Metadata" tab.
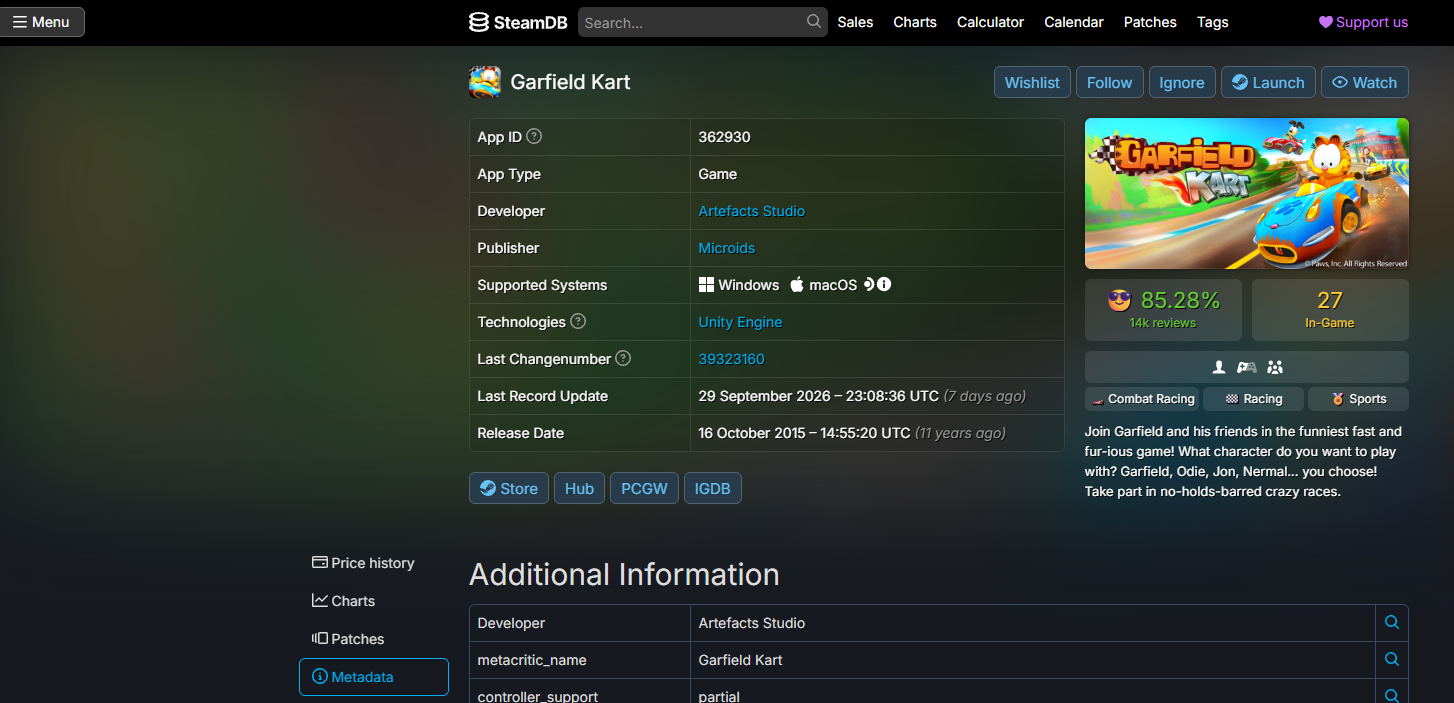
Next, you want to scroll down or use CTRL+F to find the capsule assets.
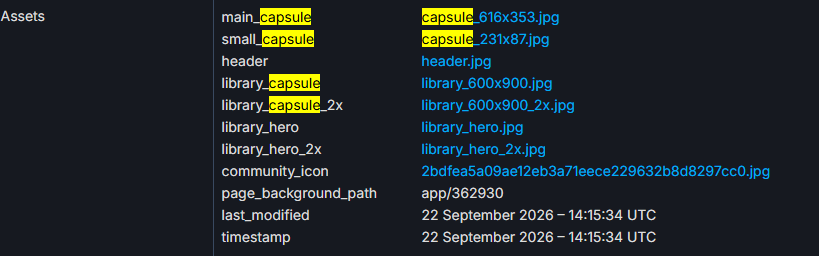
I usually use the library_capsule as they are a convinient size and shape, but you can pick any asset here really! All you need to do once you've decided is copy the link address. It should look something along the lines of
https://shared.fastly.steamstatic.com/store_item_assets/steam/apps/362930/library_600x900.jpg?t=1790086534Then, just copy that link into the cover property and your done! It should now show that image when you look at the card in the library

Extra Game info
This is the 'Favourite?' heart and star-based 'Rating' I added later to make it even more fancy :)
Adding the properties
To display favourites, you first need to have a checkbox (boolean) property on your game. Make a new property on your game list, then click it. A dropdown should let you change the property type from its default to a checkbox type! If your stuck, check my final examples for what it looks like on the game's note page.
Repeat for rating, instead making it a number type.
Displaying the raw info
You can now go into your library view and click properties. This is where you can choose what properties will be displayed for each note in the view.
If we just use the raw data for rating and favourite, it works! However, its a bit bland..
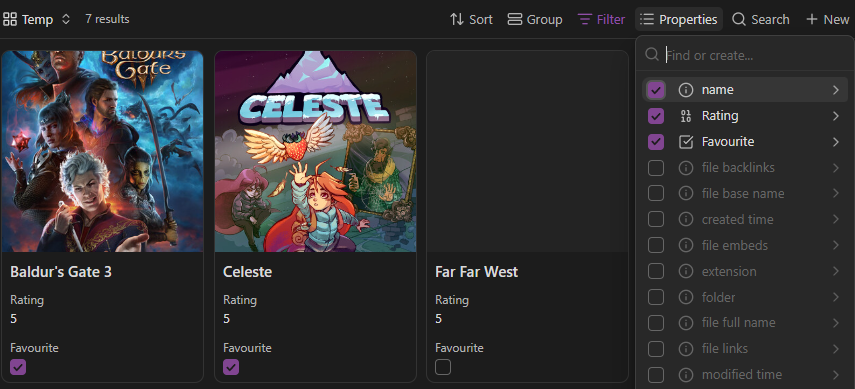
Formulas can be used to spruce up the design a bit. Formulas can take information from a note and its properties, and use it to do maths or other manipulation.Its quite similar to Excel! If that sounds fun, the documentation is here, go nuts with custom displays! If not, you can copy and paste mine. :)
Formulas can be added by the "Create Formula" button at the bottom of the properties list. You can copy the below codes into the text box that appears, just remember to make a unique formula for each!
'Favourite Heart' Formula
if(favourite == true, "❤️", "")
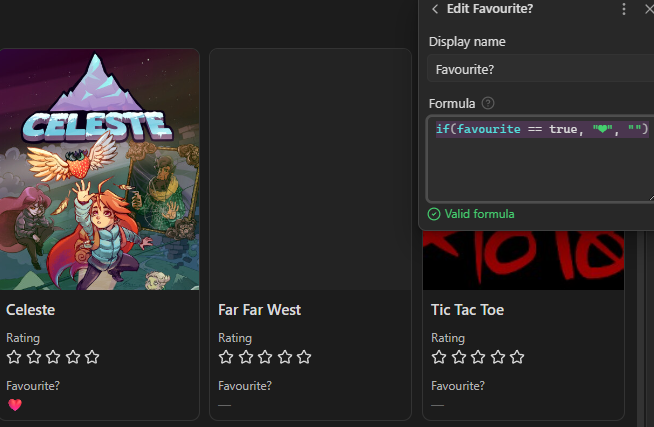
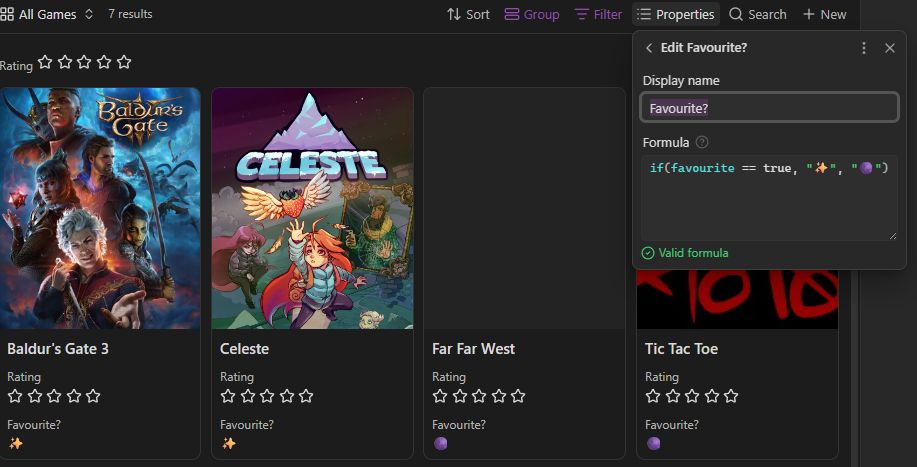
If you want to change what a favourite/non favourite game is displayed as, just change whats in the two sets of speech marks! If you want a more space vibe, heres one I made:
if(favourite == true, "✨", "🌑")
'Star Rating' Formula
if(rating > 0, [
  '⭐⭐⭐⭐⭐'.slice(0, rating).split('').map(icon('star')),
  if(number(rating) - number(rating).floor() >= 0.5, icon('star-half'), '')
].flat(), icon("circle-question-mark"))
This ones a little more complicated, and I took this formula from Nithin Bekal's blog rather than making it myself.
It does two things:
- Add 1 'star' icon for the whole number rating (e.g rating of 4 = ⭐⭐⭐⭐)
- If the decimal is over half (e.g rating of 4.7), it will add a custom 'star-half' icon tot the end.
This was updated by me after I made this guide. The extra if statement lets you rate games negatively, showing a placeholder question mark symbol for games you dont play! I haven't updated the images or other example to include this yet.
To customise it yourself, you can use custom icon codes too. Here is the icon library Obsidian uses if you want to give it a try! Theres an example below to help. Emoji's should work, but icons have more choice and will also work for the favourite formula!
Icon Change - Cat Example
[
  '⭐⭐⭐⭐⭐'.slice(0, rating).split('').map(icon('cat')),
  if(number(rating) - number(rating).floor() >= 0.5, icon('paw-print'), '')
].flat()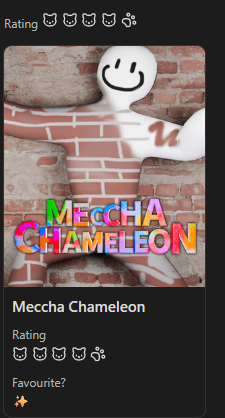
I might keep this one, its cute :3
Grouping by Rating
The final change I recommend doing is to change your grouping. Its next to filters and lets you split up the library into neat shelves using the favourites or ratings properties!
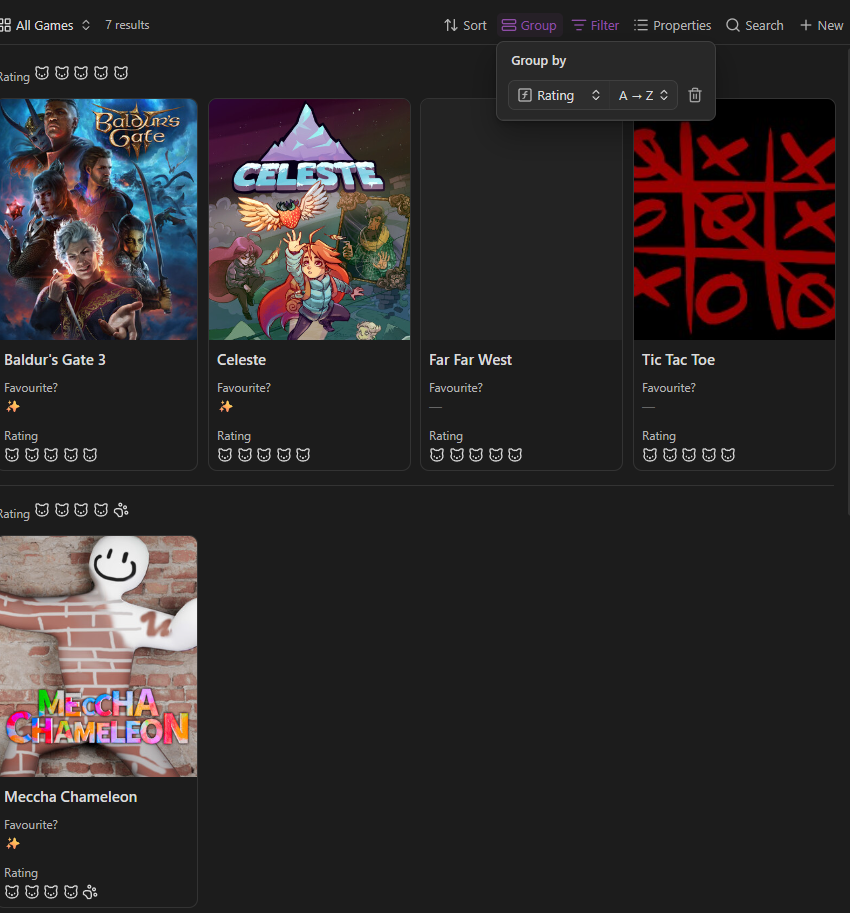
Its done! Thanks for taking all the time to read this, enjoy your new little library! If you went through this guide in hopes of learning a bit more about Obsidian, I hope I didn't make it sound too daunting. This covers quite a lot of different features at once, so not everything you do in the software has to be this intertwined!
If you want to make it easier to flick through big collections, you can make new views in your library base. Each view can have its own custom filters, groupings and properties so you can use what you learned here to customise it a lot more! Maybe one only displays favourites? Or shows what games are multiplayer? Its yours to play around with!
Tasks [W.I.P]
Tasks is a very important part of my experience. This plugin has transformed the way I think about my daily studying and life, everything feels a little bit more managble now.
This guide is a little more advanced and requires a community made plugin. Obsidian stores it's files as unecrypted markdown, so be careful what plugins you install and what data could be risked if one were to be malicious. However, Tasks is a very well maintained plugin with millions of downloads so I personally trust it to be safe!
Let's start with the final result:
Final Result
TODO: Continue tasks